The Fortnite storm isn’t just a game mechanic, it’s the heartbeat of every match. Whether you’re a casual player dropping in for a few rounds or grinding towards competitive rankings, understanding how the storm works separates the survivors from the eliminated. In 2026, the storm system has become more nuanced than ever, with improved visuals, dynamic shrinking patterns, and mechanics that reward strategic positioning over panic rotations. This guide breaks down everything you need to know: how the Fortnite storm damages you, how to predict where it’s heading, and how to navigate it without wasting resources or exposing yourself to enemy fire. Master these fundamentals, and you’ll find yourself in more endgames, clutching more wins, and actually enjoying the chaos instead of dreading it.
Table of Contents
ToggleKey Takeaways
- The Fortnite storm damages players outside the safe zone with scaling intensity—starting at 1-2 HP per second early game and ramping to 10+ HP per second in endgame, forcing strategic positioning over panic rotations.
- Predicting the storm’s next safe zone by reading the storm eye on your minimap and understanding its predictable shrinking patterns lets you rotate proactively 30-60 seconds before movement becomes mandatory.
- Effective healing inventory management—prioritizing shields first and carrying 200+ total healing items (shields, medkits, and Slurp Juice)—determines your survival in mid and late-game rotations far more than combat skill alone.
- Late-game Fortnite storm survival depends on entering safe zones early with positioning advantage, avoiding extended fights near the shrinking zone, and using movement items like rifts strategically to skip storm damage entirely.
- Avoid high-traffic rotation routes and direct lines to the safe zone; instead, use map perimeter paths, natural cover, and early rotations to outmaneuver competing squads and reduce enemy encounters.
- Storm baiting—arriving early to high-ground safe zones and using storm damage as free pressure on enemies—is an advanced tactic that separates competitive players from casual ones.
What Is The Fortnite Storm and How Does It Work?
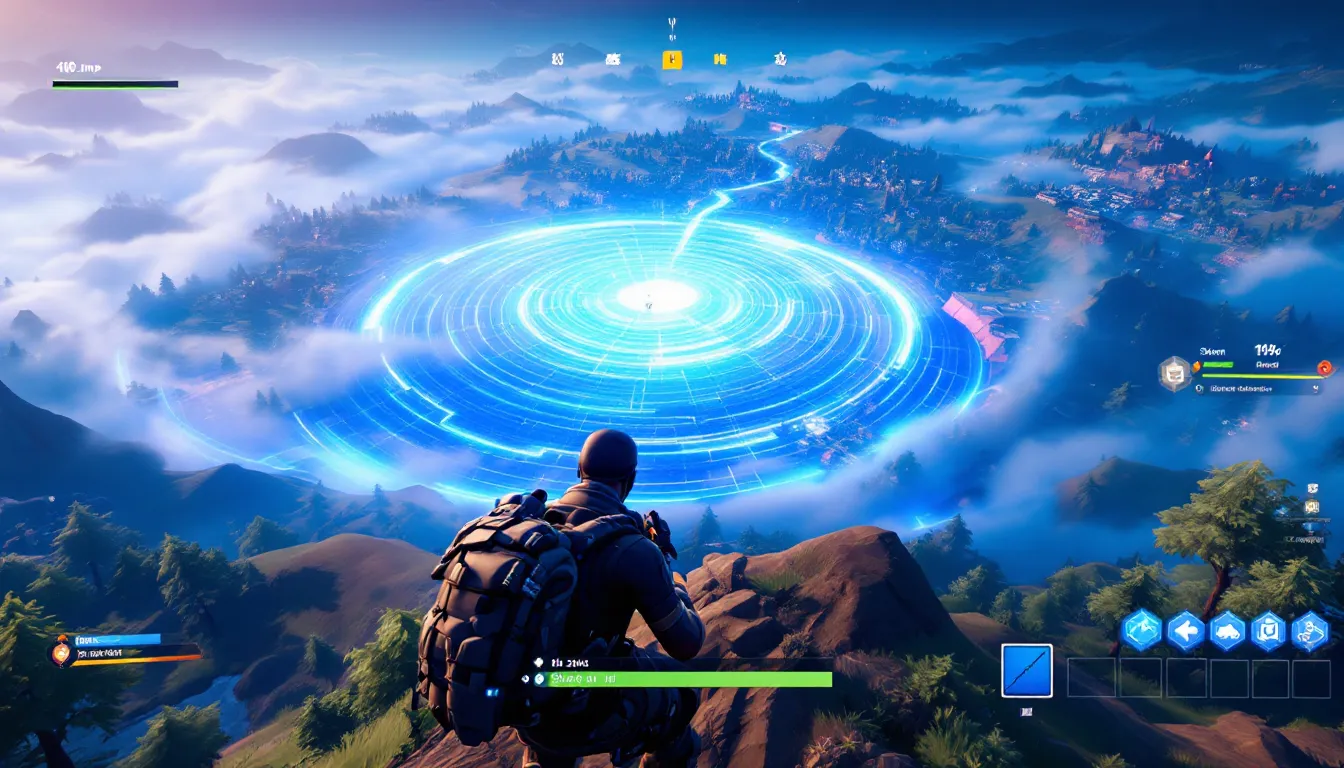
The Fortnite storm is a shrinking safe zone that pushes players together as a match progresses. It’s fundamentally a timer disguised as environmental hazard, designed to prevent matches from dragging endlessly and to force combat encounters. Every player in the storm takes damage: every player outside the safe zone experiences it. Understanding the storm isn’t optional: it’s the foundation of survival.
Storm Mechanics and Damage System
The storm deals damage to any player caught outside the white safe zone circle. Damage scales with storm phases: early-game damage is negligible (usually 1-2 HP per second), but by mid-game and endgame, it ramps to 10+ HP per second. This means you can’t just ignore it early on, but ignoring it late costs you the game.
Damage applies to your shield first, then your health. A full shield (100 HP) protects you briefly, but without healing items, you’ll be forced to move or die. On PC, console (PS5, Xbox Series X/S), and Switch, the damage mechanics remain consistent, the only difference is how quickly you can rotate based on input latency.
The storm itself is visible on the minimap as a white circle with a blue outline showing the safe zone. Inside the white circle, you’re safe. Outside it, you’re taking damage every tick. The transition zone (the blue border) is where anxiety peaks: it’s a compression zone where players collide.
Storm Phases and Shrinking Patterns
Fortnite matches progress through distinct storm phases, each with its own shrink rate and timing:
Phase 1 (Early Game): Large safe zone, minimal damage. Players have breathing room to loot and rotate.
Phase 2 (Early-Mid Game): First notable shrink. The circle contracts at a moderate pace. This is when you start thinking about rotations.
Phase 3-4 (Mid Game): Aggressive shrink rates. Damage increases to 4-6 HP per second. Rotations become mandatory.
Phase 5+ (Late Game): Extreme compression. Safe zones are tiny: damage is severe (10+ HP per second). Combat is constant, rotations are desperate, and positioning is everything.
Each phase has a set duration timer visible on your HUD. Knowing these timers lets you plan ahead instead of reacting in panic. The shrink pattern isn’t random, it follows a predictable algorithm that starts from the center of the previous safe zone and contracts inward.
Storm Movement and Prediction
Predicting the storm is a game-changer. While the safe zone location is randomized each match, the mechanics of how it shrinks follow consistent patterns. Reading the storm eye (the center of the next safe zone) and understanding the shrink direction lets you rotate proactively instead of reactively.
Reading the Storm Eye and Safe Zones
The storm eye is shown on your minimap as a white circle within the blue shrinking zone. This is where the next safe zone will be. Experienced players look at this the moment a new phase begins and make rotation plans immediately.
To read it effectively:
- Glance at the minimap constantly. Don’t wait until the storm is chasing you: check every 15-20 seconds.
- Identify your position relative to the eye. Are you inside? Heading towards it? Or far off?
- Determine the safest rotation path. A direct line is fastest but predictable. Consider cover and hotspots.
- Plan for vertical elevation changes. If the eye is uphill or across water, factor in extra rotation time.
On Switch and mobile, map visibility can be challenging. Use landmarks instead: “The eye is near Lazy Links” gives you a better sense than coordinates. Console players (PS5, Xbox) have full map clarity like PC, use that advantage.
Anticipating the Next Circle
While the safe zone itself is randomized, the shrink pattern isn’t. The next safe zone will always be a subset of the current safe zone, it never expands outward or teleports. This means you can anticipate rotations two or three phases ahead.
The storm always shrinks from the outer edge inward, so positions on the “leading edge” (the side the storm is moving from) have more time before they’re in danger. Conversely, trailing edges compress faster.
Competitive players study the map heat map: which zones are statistically likely to be safe based on historical data. Certain map areas (often central locations) are more likely to be safe zones than edges. Playing center-map, when the storm allows, puts you ahead of the curve.
Storm Survival Strategies for Different Game Phases
Survival strategy changes dramatically as the match progresses. What works in early game gets you killed by mid-game. Master phase-specific tactics, and you’ll adapt seamlessly.
Early Game: Positioning and Rotation Planning
Early game (first two storm phases) is about establishing a position with good loot and minimal threat. The storm damage is negligible, you can tank it with shield alone. Your priority isn’t escaping the storm: it’s gearing up and avoiding early fights you don’t want.
Strategy checklist:
- Land near the storm eye if possible. If the eye is near your desired landing spot, you’re ahead. If it’s far, consider landing elsewhere and rotating early.
- Avoid major hotspots unless confident. Landing at a named location with 5+ other squads guarantees early combat. Early kills feel good, but early deaths feel worse.
- Grab meds and shields first. Potions and shields have priority over weapons. A shielded player with an AR beats a fully loaded player with no defenses.
- Plan your rotation before the storm forces it. Don’t wait for the circle to shrink: rotate 30-45 seconds before the new safe zone begins closing.
On competitive modes, players often rotate toward the eye immediately after landing. This “storm chasing” can pay off if you’re confident in combat. Casual modes are more forgiving, take your time.
Mid Game: Resource Management and Safe Path Navigation
Mid-game (phases 3-4) is the marathon. You’re not desperate yet, but you’re no longer safe. Storm damage increases noticeably, and the map becomes more populated as zones compress.
Key principles:
- Ration healing items aggressively. You’ll need meds for endgame. Use shields for storm damage: save health pots for combat wounds.
- Navigate the edges, not the center. Rotating through the middle exposes you to every squad in the zone. Perimeter routes are longer but safer.
- Build defensively during rotation. Don’t build a tower, you’ll get sniped. Instead, build cover: walls, ramps, and minimal structures to break enemy sightlines while moving.
- Stop and heal before the storm hits hard. Don’t panic-rotate. If you have time, find cover, heal to full, then move. Arriving at the safe zone with 30 HP is worse than arriving late with 150 HP.
- Use natural terrain and buildings. Trees, hills, and structures block enemy shots. Navigate using cover, not open fields.
Resource management determines endgame viability. Burning 10 shield pots in mid-game leaves you vulnerable in final circles where everyone has full shields.
Late Game: Endgame Storm Tactics and High-Pressure Rotations
Late game (phases 5+) is where most players choke. Storm damage is catastrophic, safe zones are tiny, and every player alive is a threat. Decision-making collapses under pressure.
Endgame survival:
- Prioritize rotation over combat. A kill 50 meters from the safe zone isn’t worth the storm damage you take pursuing it. Let enemies rotate first and punish them in the next zone.
- Enter the safe zone early with positioning advantage. Being inside with high ground beats rotating in at the last second and ground-level.
- Use rifts, launches, or speed boosts strategically. Save movement items for the final rotation when the storm is fastest.
- Predict player convergence points. All survivors must pass through bottlenecks (choke points like bridges or canyon entrances). Set up in advance and ambush incoming players.
- Trust your healing priority. In final zones, staying alive matters more than eliminating threats. Heal aggressively: let others take storm damage.
Watch esports clips from Dexerto to see how pros handle endgame storm rotations. They rotate early, hold position, and let the storm compress enemies into their sightlines.
Essential Storm Navigation Tools and Items
Survival isn’t just about strategy, it’s about having the right tools. Certain items are storm-survival essentials: others are luxury.
Healing Items and Storm Damage Mitigation
Healing items are your primary defense against the storm. Here’s the hierarchy:
Shields (Priority 1):
- Small Shield Potions: Restore 25 shield. Fast to drink, low value.
- Shield Potions: Restore 50 shield. The standard shield item.
- Slurp Juice: Restores 25 HP + 25 shield gradually. Great for continuous recovery.
- Chug Splashes: Heal nearby teammates and yourself. Underrated for squad survival.
Health (Priority 2):
- Medkits: Restore 75 HP. Slow to use but powerful for healing after combat.
- Bandages: Restore 15 HP quickly. Useful for stopping bleeding after fights.
- Peppers: Restore 10 HP and grant movement speed. Niche but helpful for rotations.
In storm scenarios, shields matter more because they replenish between fights and stack with natural regeneration. Health potions are for combat recovery, not storm mitigation.
Loadout example for mid-game: 2 Shield Potions, 2 Medkits, 1 Slurp Juice. This gives you ~200 total healing and flexibility for both storm and combat.
Movement Items and Speed Boosts
Speed and mobility are survival tools. Faster rotations mean less storm damage taken and earlier positioning in safe zones.
Key movement items:
- Rifts/Rift Fields: Teleport or float through the air. Invaluable for skipping storm zones entirely.
- Launch Pads: Propel yourself across the map. Usually found in late-game loot or NPC drops.
- Impulse Grenades: Push yourself and enemies. Useful for quick escapes or teammate relocations.
- Shield Kegs: Grant temporary shield while building momentum. Specialized but powerful.
Movement items are so valuable in late-game that some professionals sacrifice weapon slots to carry them. A rift in final circles can mean the difference between winning and dying to storm.
Pro tip: Stack movement items. Having two rifts or a launch pad + rift gives you redundancy if you need to rotate twice.
Storm Rotations and Map Knowledge
Winning games hinges on smart rotations. Good map knowledge transforms panic into planning.
High-Traffic Rotation Routes and Their Risks
Certain rotation paths are obvious, and hence dangerous. Every player with a heartbeat knows the main roads.
High-traffic routes to avoid:
- Direct lines to the eye: The most obvious path. Enemy squads camp along it, waiting for targets.
- Major named locations: Tilted Towers, Retail Row, and central POIs are rotation hubs. Transiting through them means running into other players.
- Open fields and roads: Exposed. Snipers love wide-open rotations.
- Bottlenecks (bridges, narrow passes): Choke points where players pile up. Easy ambush locations.
Traffic routes are tempting because they’re fast, but speed isn’t survival. Taking 30 extra seconds for a safe route beats dying in a squad fight.
On competitive playlists, professionals actively avoid high-traffic routes. Watch how Game8’s build guides highlight positioning over pure rotations, positioning lets you avoid traffic entirely.
Off-Path Rotations and Safe Alternatives
Safe rotation strategy:
- Use the perimeter of the map. Map edges are safer because fewer players rotate along edges (they take longer).
- Navigate through landmarks with cover. Forests, canyons, and urban clusters provide sightline breaks.
- Use vertical advantage. Climbing hills or staying elevated gives you sightlines into valleys where enemies rotate.
- Rotate early, rotate slow. Moving to the next safe zone 30-45 seconds before it closes beats rushing in panic. Slow, methodical rotations often go uncontested.
- Use rifts or mobility over sprinting. Teleporting or launching avoids damage and enemy fire simultaneously.
Map knowledge example: If the eye is at Lazy Links and you’re at Retail Row, the obvious route is a direct line. The smart route? Head north to Diner, then east through Pleasant Park. It’s longer, but you avoid the 8 squads rotating the direct line.
Players who study the map gain a massive advantage. Memorize which landmarks have rifts, which routes have natural cover, and which rotations your region’s players tend to take. Predict competitor behavior and exploit it.
Common Storm Mistakes and How to Avoid Them
Most players lose to the storm through poor decisions, not bad luck. Recognizing mistakes before making them is half the battle.
Panic Rotation and Poor Decision-Making
Panic rotation happens when players wait too long before moving. The storm closes in: suddenly they’re sprinting with half health, making desperate decisions, and usually dying.
Mistakes:
- Ignoring the minimap. Not checking the safe zone until the storm is chasing you is suicide. Check constantly.
- Committing to fights you’re already losing. If you’re 50 meters from the safe zone and in a firefight with another squad, leave the fight. Storm damage will finish them: you don’t need the elimination.
- Rotating in a straight line. Direct routes are fast but predictable. Enemy squads intercept straight-line rotators easily.
- Taking long-range engagements during rotation. Stop to snipe? Get sniped back. Rotation phases are for moving, not for frags.
Fix: Set mental timers. When the storm phase starts, plan your rotation immediately. Move with 60+ seconds to spare. This eliminates panic because you’re never rushed.
Neglecting Storm Damage and Resource Depletion
New players underestimate storm damage. They assume shields alone protect them, then run out of heals by mid-game.
Mistakes:
- Not carrying enough healing. 200+ total healing (shields + health) is the minimum for mid-game. Less than that and you’re vulnerable to any extended rotation.
- Using heals inefficiently. Drinking a medkit at 90 HP wastes 75 heal. Use small heals for small damage: save medkits for emergencies.
- Neglecting shield regen. Shields regenerate naturally after 6 seconds of not taking damage. Use this, heal shield by waiting, not by drinking potions.
- Ignoring Slurp Juice and passive heals. Items that heal over time are underrated for storm survival. They let you move while healing.
Fix: Inventory discipline. Before rotating, check: Do I have 3+ shield potions? At least 1 medkit? A slurp or healing item for sustained recovery? If no, loot before moving.
Watch how Twinfinite guides break down loadout discipline. Loadout management determines survival rates more than raw combat skill.
Advanced Storm Techniques and Pro Tips
Once basics are mastered, advanced techniques separate good players from great ones.
Storm Baiting and Competitive Play Tactics
Storm baiting is a high-level tactic: using the storm as a weapon to damage enemies while you rotate safely.
Storm baiting mechanics:
- Predict where enemies will be when the storm closes. Place yourself where they’ll funnel through, with the storm behind you pushing them toward you.
- Use storm damage as free DPS. If an enemy is in the storm and you’re in the safe zone, they’re losing health while you’re safe. They have to move or die.
- Rotate early to high-ground safe zones. Arriving early to elevated terrain in the next safe zone gives you sightlines into the storm zone. Enemies rotating in are silhouetted and vulnerable.
- Cache healing and ammunition before the final circle. Knowing you have resources in endgame lets you take positions that appear vulnerable but are actually defensible.
Storm baiting requires confidence and map knowledge. Pros do this instinctively: newer players struggle because they focus on the next safe zone instead of trap positioning.
Example: If the eye is at hill X and enemies are at valley Y, rotate to the high ground at hill X early. Position yourself on the edge facing valley Y. When enemies rotate toward the hill, they’re climbing uphill, taking storm damage, and exposed. Free kills.
Building Efficiently While Rotating Through the Storm
Building during rotation is tempting but risky. Structures take time and materials: they expose your position and make you a target.
Efficient rotation building:
- Build only for cover breaks, not towers. A single wall or ramp breaks sightlines. A full base makes you a sniper magnet.
- Use natural cover first. Trees, hills, and buildings are free cover. Build only when natural cover is unavailable.
- Practice material economy. Carry 999 materials? Use them strategically in fights, not nervously during rotations. Rotation building should use under 50 materials per phase.
- Build ramps for elevation, not height. A gentle slope helps you climb hills faster. A tall tower slows you down and gets sniped.
- Avoid building near enemies. If you’re rotating and see an enemy, keep moving. Building means stopping, which means getting shot.
Pro rotation building: Use the best weapon in Fortnite paired with lightweight building. Carry an AR and SMG, minimal meds and shields. Build only walls during rotations, prioritizing speed over fortress-building.
Competitive players minimize building during rotations because every second counts. Rotation speed and positioning matter more than structures.
Conclusion
Mastering the Fortnite storm transforms your survival rate, endgame consistency, and overall win rate. The storm isn’t a random hazard, it’s a predictable system that rewards planning, positioning, and resource management.
Start by checking your minimap religiously and rotating 60 seconds before you need to. Build inventory discipline by carrying 200+ healing items and learning the map. Once basics click, advance to storm baiting and competitive positioning tactics.
The difference between a player who dies to the storm every other game and a player who consistently survives comes down to awareness and decision-making. You can’t change the storm’s behavior, but you can control how you respond to it.
Jump into matches with these fundamentals in mind, and you’ll find yourself in more final circles, clutching more victories, and finally understanding why the storm is feared, and how to dominate it. For deeper strategy on gear and loadout optimization, explore the Fortnite Archives on Warrior Gamers Arena for additional guides on mastering every aspect of the game.